
Using Third-Party Terminal Emulators with ConsoleWorks
Like previous versions of ConsoleWorks, ConsoleWorks 4 enables you to define the use of third-party Terminal Emulators, such as Reflection, Powerterm, and KeaTerm, on your Windows client machine.
Note that the steps to do this are a bit different from previous versions.
1- Download and install the Windows Client Kit, or CWCLIent.
You need your TDI-provided Download credentials and you must be a local Administrator on your machine to install this program.
 click for larger image
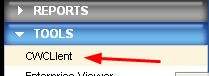
a) On the ConsoleWorks menu, click TOOLS > CWCLIent
b) On the TOOLS: CWCLIent page, click the Download CWCLIent link.
c) Run the installer that appears to install a program named CWTProx.
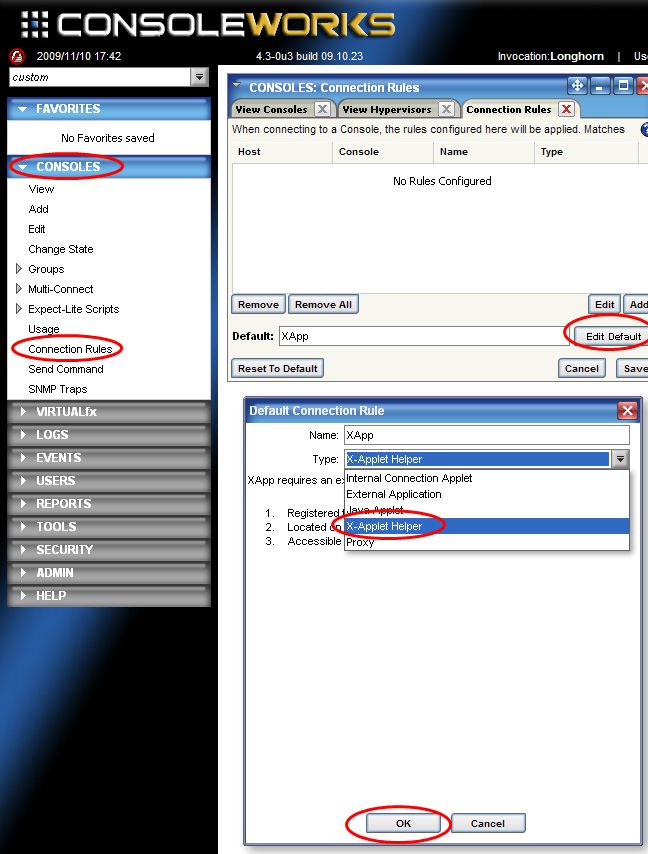
2- Make X-Applet Helper the default connection type.
 click for larger image
a) On the ConsoleWorks menu, click Consoles > Connection Rules, and select Edit Default.
b) On the Type drop-down list, select X-Applet Helper.
c) Press OK.
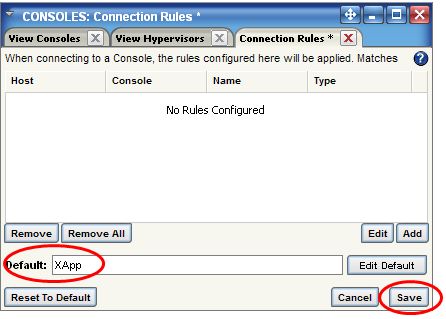
3- Note that the Default window now contains XApp, and press Save.
 click for larger image
4- On the View Consoles page, select a Console for testing, and click Connect.
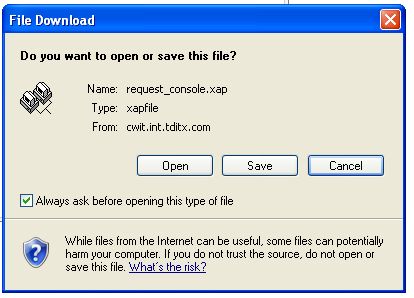
5- On the File Download box, click Open.
 click for larger image
The xapfile runs. The Pick Application box appears
6- Use the Pick Application box to specify the terminal emulator you want used for connections.
Completing this task stops the Pick Application box from opening every time you use CWTProx.
For your convenience, CWTProx comes equipped with configurations for many industry-standard terminal emulators. Use one of these well-known emulators to connect to Consoles, or configure CWTProx to use another emulator, or accept the default connector: Windows Telent.
To use a known emulator
Complete the following steps on the Pick Application box:
a) In the Console box, enter the name of the Console to which you want to connect.
Note: CWTProx applies this configuration to any Console with this name across all ConsoleWorks invocations.
Best Practice: Use (Default) in the Console box for the connection configuration you use most often. For example, if you typically connect to Consoles at your site through Reflection, then configure (Default) to use Reflection. This strategy saves you from having to repeatedly reconfigure your connection as you add and drop connections to these Consoles.
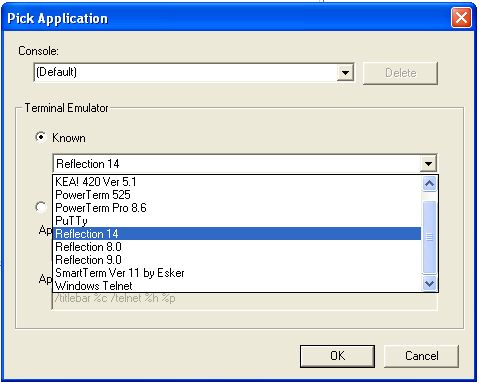 click for larger image
b) In the Terminal Emulator group, click Known, and select the emulator from the drop-down list. Select the closest version to your installed terminal emulator, if your site's version is not listed.
To add an emulator to the list, see this Wiki entry.
c) Click OK.
The terminal emulator appears and connects to the specified managed asset.
To use a custom emulator
Complete the following steps on the Pick Application box:
a) In the Console box, enter the name of the Console to which you want to connect.
Note: CWTProx applies this configuration to any Console with this name across all ConsoleWorks invocations.
Best Practice: Use (Default) in the Console box for the connection configuration you use most often. For example, if you typically connect to Consoles at your site through Reflection, then configure (Default) to use Reflection. This strategy saves you from having to repeatedly reconfigure your connection as you add and drop connections to these Consoles.
b) In the Terminal Emulator group, click Custom.
c) In the Application box, type the full path to the emulator or use the Browse feature.
d) In the Application Parameters box, type the configuration parameters for the emulator. Ensure that you put a space between parameters. ConsoleWorks sends these parameters to the terminal emulator when the emulator starts.
Tip: Use the same variables in the same syntax for the parameters that you use to start the terminal emulator from a command line.
e) Click OK.
The terminal emulator appears and connects to the specified managed asset.
To use PuTTy
For initial CWTProx configuration only
Complete the following steps on the Pick Application box:
a) Ensure that (Default) appears in the Console box.
b) Choose Custom.
c) In the Application field browse to the PuTTy Executable.For example C:\Program Files (x86)\PuTTY\putty.exe
d) Enter or paste the following into the Application Parameters field without the quotes: "-load %c -telnet -P %p localhost"
e) Click OK to save your changes
The terminal emulator appears and connects to the specified managed asset.
To use Windows Telnet
For initial CWTProx configuration only
Complete the following steps on the Pick Application box:
a) Ensure that (Default) appears in the Console box.
b) Select Windows Telnet from the Known picklist
c) Click OK.
The terminal emulator appears and connects to the specified managed asset.
Note: On subsequent connection attempts, the CWTProx application loads into the Windows Taskbar so as to be non-obtrusive.
Changing a Connection Configuration
To make a change to the connection configuration:
a) On the Windows taskbar, right-click the ConsoleWorks Telnet Proxy status window, and then click Pick Application. If you left-click it, you'll be presented with a dialog that provides connection data.
b) On the Pick Application box, change the configuration information.
Tip: The Console drop-down list displays the names of any Console with a configured CWTProx connection to the local workstation.
c) Click OK.
The terminal emulator appears and connects to the specified managed asset.
Deleting a Connection Configuration
a) On the Pick Application box, select on the Console box's drop-down list the name of the configuration that you want to delete.
b) Click Delete.
Note. You cannot delete the (Default) configuration.